Create a Simple React Component Library with Vite
September 25, 2023
Introduction
When developing web applications, you will inevitably run into a situation where you want to reuse the same component across different projects.
That's where a well-structured and fully-typed component library comes in handy. It promotes code reusability, saves time by avoiding redundant tasks (like updating the same component in different projects), ensures design and functionality consistency across projects, and enhances code maintainability through TypeScript's type safety.
In this blog post, I'll cover how to set up a typescript React project using Vite and install Storybook. I will also show you how to utilize Vite's library mode to bundle the library for distribution, and what configurations have to be made for it to work.
Last but not least, we will import the components of our library and use them in a different project, to test that everything works properly.
Note: In this article, I won't be covering how to publish the library. We will test it locally with npm link.
Create a React Typescript Project with Vite
Vite is a build tool that aims to provide a faster and leaner development experience for modern web projects. We are going to use it as a replacement for Create React App.
We will be using one of the project templates provided on the Vite website. More
specifically, the react-ts template. All we have to do is run the following command in the terminal:
npm create vite@latest vite-storybook-library -- --template react-ts
This will create a folder inside your current directory called "vite-storybook-library". You can name your library whatever you want by changing the name in the command above!
Next, we have to move to the project's directory and install the necessary dependencies:
cd vite-storybook-librarynpm installnpm run dev
That's it! You should be able to access Vite's example page by navigating to http://localhost:5173/ (that's the default port Vite uses, it might be different for you, so check the output in the terminal).
Optional: At this point, you can also initialize a git repository by running the git init command in your terminal and then creating a commit,
so you can track further changes:
git initgit commit -m "Initial commit"
Install Storybook
Storybook is a frontend workshop for building UI components and pages in isolation. Thousands of teams use it for UI development, testing, and documentation. It’s open source and free.
It is particularly useful when creating component libraries as it allows you to view your components in real time and play around with your component's props through its easy-to-use UI.
I won't go into detail about how Storybook works, but feel free to read more about it in its very detailed documentation if you are new to it!
To add Storybook to our project, all we have to do is run the following command in the terminal:
npx storybook@latest init
The above command is not meant to be run on an empty project. It will look into our project's dependencies during its installation process and provide you with the best configuration available.
After installation is complete, the Storybook UI should automatically open in your browser. If not, then you can manually start storybook and navigate to http://localhost:6006/, by using the following command:
npm run storybook
Optional: If you want you can delete Vite's example page by removing App.tsx, App.css, main.tsx and index.css files, as Storybook provides
its own development server and we no longer have to import our components in a test page to view them.
Set up the Project for Vite Library Mode
Currently, by running npm run build we bundle the whole application inside the src folder, just like a normal React application. We instead only
want to bundle the reusable components of our library. To achieve this, we can use
Vite Library Mode by using the
build.lib config option in the vite.config.ts file.
Organize the Project's Structure
First, let's organize our project a bit better by moving the components we want to export from our library to a different folder. Create a folder
called lib in the project's root folder and a second folder inside it called components.
Now let's move Storybook's Button and Header components there, along with their CSS files. We should also add the lib folder to the include
array in tsconfig.json, to enable Typescript for that folder too, as only the src folder is included by default:
"include": ["src", "lib"]
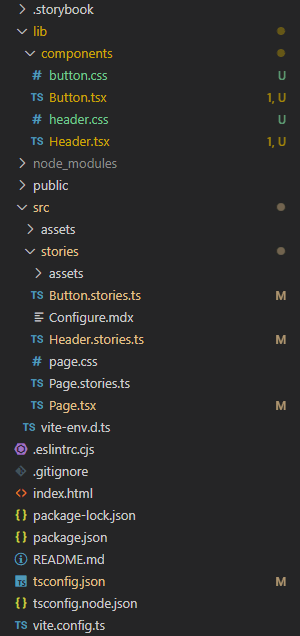
Your project's folder structure should look something like this:
Next, we are going to add the file that contains the exports that users of the library can import. Create a file named vite-storybook-library.ts
inside the lib folder which contains the following:
// vite-storybook-library.tsimport { Button } from "./components/Button";import { Header } from "./components/Header";export { Button, Header };
File configurations
We want to update the vite.config.ts file to enable the library mode by adding the lib property inside build. There we define the entry point of
our library, which is the file that contains all the component exports, and we also tell the bundler to not include external libraries such as react
and react-dom.
We also want to declare our type definitions so that our library comes fully typed. There is a Vite plugin that automatically creates the .d.ts
files needed called vite-plugin-dts. All we have to do is install it as a dev dependency and add it to the
plugins array:
npm install vite-plugin-dts -D
We should also tell the plugin to only generate type definitions for the files inside the lib folder, as we don't need them for the rest of the
files (e.g. Button.stories.ts).
Another plugin, that is needed for the styles of the components to work automatically, is the
vite-plugin-lib-inject-css plugin. Without this plugin, we
would have to manually import the CSS file generated inside the dist folder when we want to use the components. It wouldn't be the end of the world,
but it's nice to have:
npm install vite-plugin-lib-inject-css -D
At this point, the vite-config.ts file should look similar to this:
// vite.config.tsimport { defineConfig } from "vite"import react from "@vitejs/plugin-react"import { resolve } from "path"import dts from "vite-plugin-dts"import { libInjectCss } from "vite-plugin-lib-inject-css"export default defineConfig({plugins: [react(),dts({ include: "lib", insertTypesEntry(true) }),libInjectCss()],build: {// do not copy the contents of the public folder to the dist foldercopyPublicDir: false,lib: {// this is the file that exports our componentsentry: resolve(__dirname, "lib/vite-storybook-library.ts"),name: "ViteStorybookLibrary",fileName: "vite-storybook-library",},rollupOptions: {// make sure to externalize deps that shouldn't be bundled// into your libraryexternal: ["react", "react-dom"],output: {// Provide global variables to use in the UMD build// for externalized depsglobals: {react: "React","react-dom": "ReactDOM",},},},},})
We should also update our package.json file as suggested in Vite's documentation and move the react and react-dom packages to peerDependencies
to let people using our library know that those packages have to be installed for the library to work:
// package.json{"name": "vite-storybook-library","private": true,"version": "0.0.1","type": "module","main": "./dist/vite-storybook-library.umd.cjs","module": "./dist/vite-storybook-library.js","types": "./dist/vite-storybook-library.d.ts","exports": {".": {"import": "./dist/vite-storybook-library.js","require": "./dist/vite-storybook-library.umd.cjs"}},"files": ["dist"],"scripts": {"dev": "vite","build": "tsc && vite build","lint": "eslint . --ext ts,tsx --report-unused-disable-directives --max-warnings 0","preview": "vite preview","storybook": "storybook dev -p 6006","build-storybook": "storybook build"},"peerDependencies": {"react": "^18.2.0","react-dom": "^18.2.0"},"devDependencies": {"@storybook/addon-essentials": "^7.4.5","@storybook/addon-interactions": "^7.4.5","@storybook/addon-links": "^7.4.5","@storybook/addon-onboarding": "^1.0.8","@storybook/blocks": "^7.4.5","@storybook/react": "^7.4.5","@storybook/react-vite": "^7.4.5","@storybook/testing-library": "^0.2.1","@types/react": "^18.2.15","@types/react-dom": "^18.2.7","@typescript-eslint/eslint-plugin": "^6.0.0","@typescript-eslint/parser": "^6.0.0","@vitejs/plugin-react": "^4.0.3","eslint": "^8.45.0","eslint-plugin-react-hooks": "^4.6.0","eslint-plugin-react-refresh": "^0.4.3","eslint-plugin-storybook": "^0.6.14","react": "^18.2.0","react-dom": "^18.2.0","storybook": "^7.4.5","typescript": "^5.0.2","vite": "^4.4.5","vite-plugin-dts": "^3.5.4","vite-plugin-lib-inject-css": "^1.3.0"}}
Build and Test the Library
At this stage, we are ready to build the library by running the build command:
npm run build
To test that the library is working properly, we are going to import it to a different project. First, create a new project just like we did in the
first step of this post by using the react-ts Vite template.
Next, we have to link our library to the new project by using the npm link by doing the
following:
-
Run
npm linkin the library's folder with no arguments to create a symlink in the global folder{prefix}/lib/node_modules/<package>that links to the package where thenpm linkcommand was executed. -
In the new test project, we run
npm link vite-storybook-libraryto create a symbolic link from the globally installed library tonode_modules/of the current folder.
You should now be able to see the vite-storybook-library in the node_modules folder of the test project. We can now import and use our components
just like we would with any other library:
// App.tsximport { Button, Header } from "vite-storybook-library"
Any changes you make to the components in vite-storybook-library will be immediately available in our test project after rebuilding the library with
npm run build.
That's all for this post! I hope you found this guide helpful and that you have a fantastic day!